How to Export Check Point Log Files into a Readable Format Without Using Smartview Tracker
Rasheen Whidbee describes how to automate the export of Check Point log files into a readable format. Read more …

To keep your business online and ensure critical devices, such as Check Point firewalls, meet operational excellence standards it is helpful to compare your environment to a third party data set. As part of the Indeni Automation Platform, customers have access to Indeni Insight which benchmarks adoption of the Check Point capabilities and user behavior to adhere to ITIL best practices.
+++
Need to Export Check Point Logs Files Without Using Smartview Tracker? No Problem.
It may come as a surprise to you that some Check Point Firewalls store log files in a binary format, especially if you’re used to analyzing the logs with Smartview Tracker or if you simply have the logs forwarded to an Opsec server. This poses a unique challenge for environments that don’t want to invest in an additional logging server but want to be able to review the logs in a readable text format.
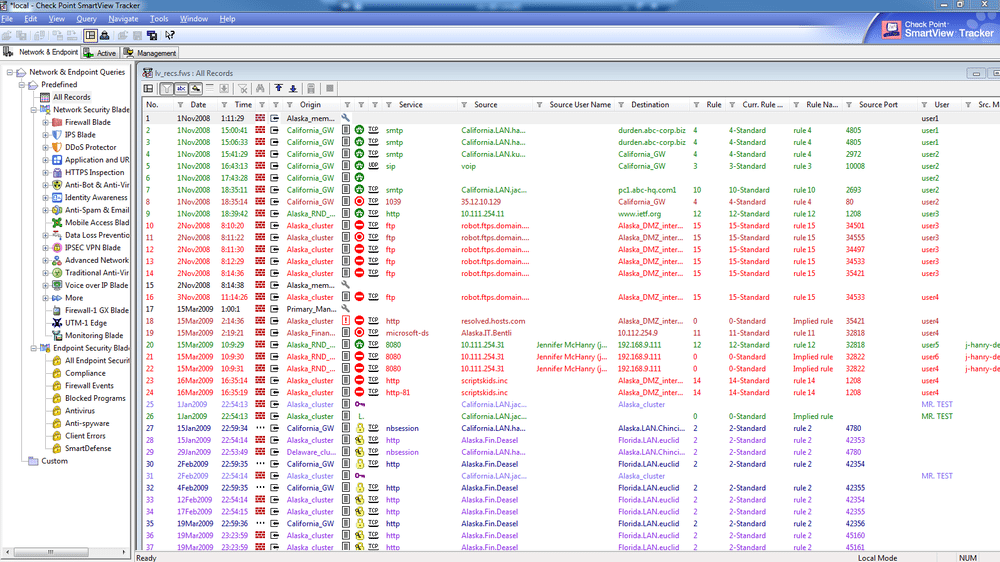
If you have the option and the license I highly recommend using Smartview Tracker. It’s a terrific application with the built in functionality to search through multiple log files, analyze traffic and create custom filters. Below is a screenshot of the application in Demo Mode, as you can see there’s an assortment of information available at your fingertips.

If however Smartview Tracker isn’t available because of your setup or simply because of your preference and a logging server is not an option, Check Point natively supports the binary to text conversion with its fwm logexport command. The fwm logexport command converts the binary formatted log into a readable ASCII format.
The built-in delimiter used for this application is a semicolon. I’ve found that by exporting the file into a CSV format and using excel to review the information to be the most convenient method without using any third party software to analyze the log files.
By default the fwm logexport command only supports conversion of one file at a time.
# fwm logexport –n –p –i filename.log –o exportfilename.csv
-n disables dns resolution and
–p disables port resolution
Unless you absolutely need dns and port resolution disabling them will tremendously speed up the conversion, -i is the default flag input file name and –o is the default flag for output file name
In a small environment that may only generate one to three log files per month this isn’t an issue, however if you’re a large scaled environment and you generate possibly hundreds of log files in a month using the fwm logexport tool one file at time can be quite time consuming and resource intensive on the side of the tech whose converting the logs. Luckily there is an easy way to work around the built in limitation of fwm logexport.
Provided below are two options for speeding up the conversion from binary to ASCII format. The first method is a more manual process which requires manually entering the file names, which would be ideal for small conversion jobs. The second method is a fully automated method which is ideal for environments with a large number of log files. Keep in mind the more familiar you are with the GAIA platform or Linux in general the more you’ll be able to tweak the below instructions and either create your own scripts or Cron jobs to automate this process.
Method 1
1. Login to your Check Point appliance as expert mode via SSH.
2. Go to the log file directory by default they are located in $FWDIR/log
3. Issue the command below:
# time fwm logexport –n –p -i filename.log –o exportfilename.csv && time fwm logexport –n –p -i filename2.log –o exportfilename2.csv && time && fwm logexport –n –p -i filename3.log –o exportfilename3.csv
Simply continue to add the & statement until you are complete. Please keep in mind that although the export command isn’t intensive it will add some load to your device, so if you’re in a standalone environment (management and gateway on the same device) then you may not want to convert all your logs at once.
-n disables dns resolution and
–p disables port resolution
Unless you absolutely need dns and port resolution disabling them will tremendously speed up the conversion, -i is the default flag input file name and –o is the default flag for output file name
(The time flag simply tells you how long the conversion took)
4. There should now be several new files “exportfilename.csv” “exportfilename2.csv” and “exportfilename3.csv” created in your current directory.
5. At this point you have the option to review the logs on the device itself or copy the logs to another machine and review them there.
Method 2 (Fully Automated)
1. Login to your Checkpoint appliance as expert mode via SSH.
2. Go to the log file directory by default they are located in $FWDIR/log
3. Create conversion script
vi conversionscript (vi being the editor you’re going to use)
(Enter into edit mode by pressing “I”) # !/bin/bash FILES=”$FWDIR/log/*.log" for f in $FILES do echo “Converting Files” time fwm logexport –n –p –I “$f” –o “$f.csv” done (Save by pressing esc and :wq)
Script explained in detail:
- # !/bin/bash – just states you’re going to use the bash shell
- FILES=”$FWDIR/log/*.log” – This declares the variable FILES, and states that any files in the $FWDIR/log directory that end with .log should be added to its value
Note: If for some reason your files are stored in a different directory you will have to change what $FILES is equal to. - for f in $FILES – this creates the loop, which will go through each variable stored in $FILES
- echo “Converting Files” – displays Converting Files while script is running
- time fwm logexport –n –p –i “$f” –o “$f.csv”
the meat and potatoes of this small script:
time (time displays how long it took to convert that particular file)
–n (-n turns off dns lookup, and just leaves the IP address of each log entry speeding up the conversion)
–p (-p disables port translation, leaving out the corresponding ports of each entry, once again speeding up the conversion)
–i (-i is the flag for the input file, in this case the input will be the variable $f which is going through the loop) -o (-o is the flag for output, in this case the output will be the name of the file ending in .csv)
- done – simply ends the script
4. Run the script, from the directory you created it by simply typing ./conversionscript
Note: Because you are automating the conversion make sure you have enough space available to store the converted logs, you may need to mount a network drive.
And that’s it, depending on how many log entries you have this script could take anywhere from 5 minutes to 5 days, so be patient. In the meantime you can check out more Check Point scripts from Indeni and our customers’ favorite automation elements.
I hope this brief tutorial was hopeful and I urge to you to continue to explore ways of automating this process. The more you become familiar with the process the more options will become available to you. You can start on your automation journey with trying Indeni.
Rasheen Whidbee is the Systems / Network Administrator at Vencore Inc. He has been working with Check Point firewalls for about three years. If you want to contribute as well, click here.