What is DNSSEC and how does it work?
DNSSEC authenticates DNS queries and responses by using cryptographic digital signatures. Learn more and how BlueCat can help to make implementation easier.

The article explains DNSSEC (Domain Name System Security Extensions) as a cryptographic set of specifications that authenticates DNS queries and responses to mitigate attacks inherent to traditional DNS resolution, such as DNS cache poisoning and man-in-the-middle spoofing. It describes how DNS operates naively by accepting any useful response, why that enables attacks, and how DNSSEC adds digital signatures (RRSIG), public/private keys (ZSK and KSK), DNSKEY and DS records to build a chain of trust validated by resolvers. The piece also outlines operational steps for DNSSEC resolution, cached validation benefits, proof of non-existence (PNE), and details how BlueCat centralizes and automates key DNSSEC tasks—key generation, signing, DS management, rollovers, PNE maintenance, and monitoring—to reduce complexity and avoid zones going dark.
What specific DNS vulnerabilities does DNSSEC address and how does it prevent them?
DNSSEC addresses vulnerabilities in standard DNS that allow attackers to inject forged responses (DNS cache poisoning or DNS spoofing) and man-in-the-middle attacks. Traditional DNS will accept any response that satisfies a resolver’s query, enabling an attacker to substitute a malicious IP address and have that response cached for the resolver’s TTL. DNSSEC prevents this by signing RRsets with private keys (stored as RRSIG records) and providing public keys (DNSKEY) and DS records to establish a verifiable chain of trust up to configured trust anchors. A validating recursive resolver uses those signatures and keys to verify authenticity; if verification fails the resolver returns SERVFAIL rather than the forged response, preventing clients from being redirected to attacker-controlled sites. DNSSEC also provides proof of non-existence (PNE) to prevent fake NXDOMAIN injections.
What are the main DNSSEC components (records and keys) and how do they interact in validation?
Core DNSSEC components are RRsets and their RRSIG signatures, zone-signing keys (ZSK) and key-signing keys (KSK), DNSKEY records, and DS records linking parent and child zones. Administrators sign RRsets with the zone’s private ZSK; those signatures are stored in RRSIG records. The ZSK public key is published in a DNSKEY record. A KSK signs the DNSKEY RRset (including the ZSK public key) and produces an RRSIG over DNSKEY, enabling validation that the ZSK hasn’t been compromised. The parent zone stores a DS record containing a hash of the child zone’s DNSKEY (typically the KSK), forming a chain of trust from parent to child. A validating resolver walks this chain—verifying RRSIGs against DNSKEYs and DS records up to a trust anchor (e.g., the root)—and returns SERVFAIL if any step fails.
How does BlueCat simplify DNSSEC implementation and ongoing operations?
BlueCat centralizes and automates many DNSSEC tasks that are error-prone and operationally complex when performed manually. According to the article, BlueCat handles background generation of cryptographic key pairs, maintains the PNE chain using NSEC or NSEC3 records, signs zones and all associated DNS records, and generates DS records for parent zones. It automates scheduled KSK and ZSK rollovers and can generate new keys for emergency rollovers, while monitoring key generation success and failure. BlueCat also provides the capability to manually generate key pairs if automated generation fails, and exposes a single platform to configure DNSSEC, reducing the risk of mistakes like incorrect resigning or PNE maintenance that could cause a zone to go dark.
As DNS was built with scalability—not security—in mind, DNSSEC can be a critical addition to your security portfolio.
But what is DNSSEC? To start, it stands for Domain Name System Security Extensions. It is a set of specifications that uses digital signatures based on cryptography to authenticate Domain Name System (DNS) queries and responses.
At first glance, implementing DNSSEC can perhaps be daunting. But any public-facing domain can reap its value.
This post will first touch on what DNSSEC is, exactly. Then it will detail how traditional DNS resolution works and why it is so susceptible to cyberattacks. Further, it will delve into the details of how DNSSEC works and the authentication steps it undertakes. Finally, it will explore how BlueCat can help make DNSSEC implementation easier.
What is DNSSEC?
It is important to note that DNSSEC and DNS security are not the same. Even though their names look similar, DNSSEC is not shorthand for DNS security. (The latter is an umbrella term that encompasses numerous strategies and products.)
So what does DNSSEC do, exactly? When enabled, DNSSEC helps a DNS server answer the following questions:
- Is the root or authoritative name server authorized to provide a query response?
- Can I trust the content of the query response?
- Further, can I trust that there were no modifications to the response in transit?
The more domains that support DNSSEC, the more secure the internet is for everyone. According to the Internet Society’s DNSSEC statistics, the majority of top-level domains have already implemented it.
DNS without DNSSEC
Normal DNS resolution is pretty simple: When a DNS query is sent by a device, domain name servers and resolvers step in to conduct a DNS lookup. They ensure that the DNS query gets a response with an IP address from the relevant record.
Unfortunately, in this case, simple also means naive. Attributes inherent to the DNS protocol can put any entity at risk for cyberattacks.
As long as the resolver receives data that serves the purpose of its request, it will continue with the query until it can send an IP address back to the client. Normal DNS resolution cannot screen the responses it gets and answer the three questions above.
This makes standard DNS queries susceptible to man-in-the-middle attacks like DNS cache poisoning (and the closely related DNS poisoning, which is also called DNS spoofing). An attacker injects a forged response to replace the legitimate response to a DNS request. The forged response points to an attacker-controlled server oftentimes configured to appear identical to the legitimate site. This can leave the end-user totally unaware that they are somewhere that they shouldn’t be.
Without DNSSEC enabled, the malicious site is also cached in the resolver. As a result, other devices using the same DNS resolver will go to the malicious site as well. It stays in the cache until its predetermined time-to-live expires, potentially affecting countless devices.
DNSSEC: How it works
At a basic level, DNSSEC validates responses to DNS queries before returning them to the client device. DNSSEC uses digital signatures stored in name servers alongside common DNS record types.
At the center of DNSSEC is a public-private key pair. Each DNS zone has a public key and a private key.
Public key cryptography is the starting point for DNSSEC validation. Available to everyone, a public key provides the means to decrypt messages signed by a corresponding private key.
To be clear, DNSSEC security does not include common measures like encrypting DNS data, SSL certificates, or shared secrets.
Some key terminology (no pun intended)
RRSIG record: Securing a DNS zone with DNSSEC starts with grouping DNS records of the same name and type (e.g., A records) into a resource record set, or RRset. The RRset—not individual DNS records—is what actually gets signed. An RRSIG record holds a cryptographic signature for an RRset.
Zone-signing key (ZSK) pair: Each DNSSEC-enabled zone has a ZSK public-private key pair. Network admins create cryptographic signatures for each RRset in the zone with the private key and store them as RRSIG records. The public ZSK key verifies the signature and is stored in the DNSKEY record.
DNSKEY record: A DNSKEY record stores the public key. There are usually two per zone, for the zone-signing key (ZSK) and key-signing key (KSK). Resolvers use DNSKEY records to verify that the signatures in RRSIG records are legitimate.
Key-signing key (KSK): To ensure that the ZSK wasn’t compromised, DNS name servers also have a KSK to validate the public ZSK. It signs the public key in the ZSK and creates an RRSIG for the DNSKEY record. The private KSK signs public keys for both ZSKs and KSKs.
DS record: The DS record proves a linkage between a parent and child zone. DS records reside in the parent zone and contain a hash of the DNSKEY from the child zone that contains the KSK. DS records point to the next key in the chain of trust.
The chain of trust
Because each cryptographic key signs a subsequent cryptographic key, allowing each DNS zone to validate the next level below it, it creates what is termed a chain of trust. At the top of the chain are trust anchors.
Each level of the domain name system performs validation. After verifying the authenticity of the answers, the client device receives the answer. If the chain of trust breaks at any point and record verification cannot occur, the DNS server will respond back with a SERVFAIL DNS response code instead.
DNSSEC explained in step-by-step
The basic steps of DNSSEC resolution and validation go like this:
- First, the client requests an A record for example.com from its local validating recursive server.
- The validating recursive server follows the normal recursion path from root down to the authoritative servers of the zone for example.com.
- Next, the recursive server requests the A record from the authoritative server.
- The authoritative server answers with the A record and corresponding RRSIG A record for example.com.
- Then, the recursive server asks the example.com authoritative server for the DNSKEY record for the zone.
- The authoritative server for example.com returns the DNSKEY record and corresponding RRSIG DNSKEY record for example.com.
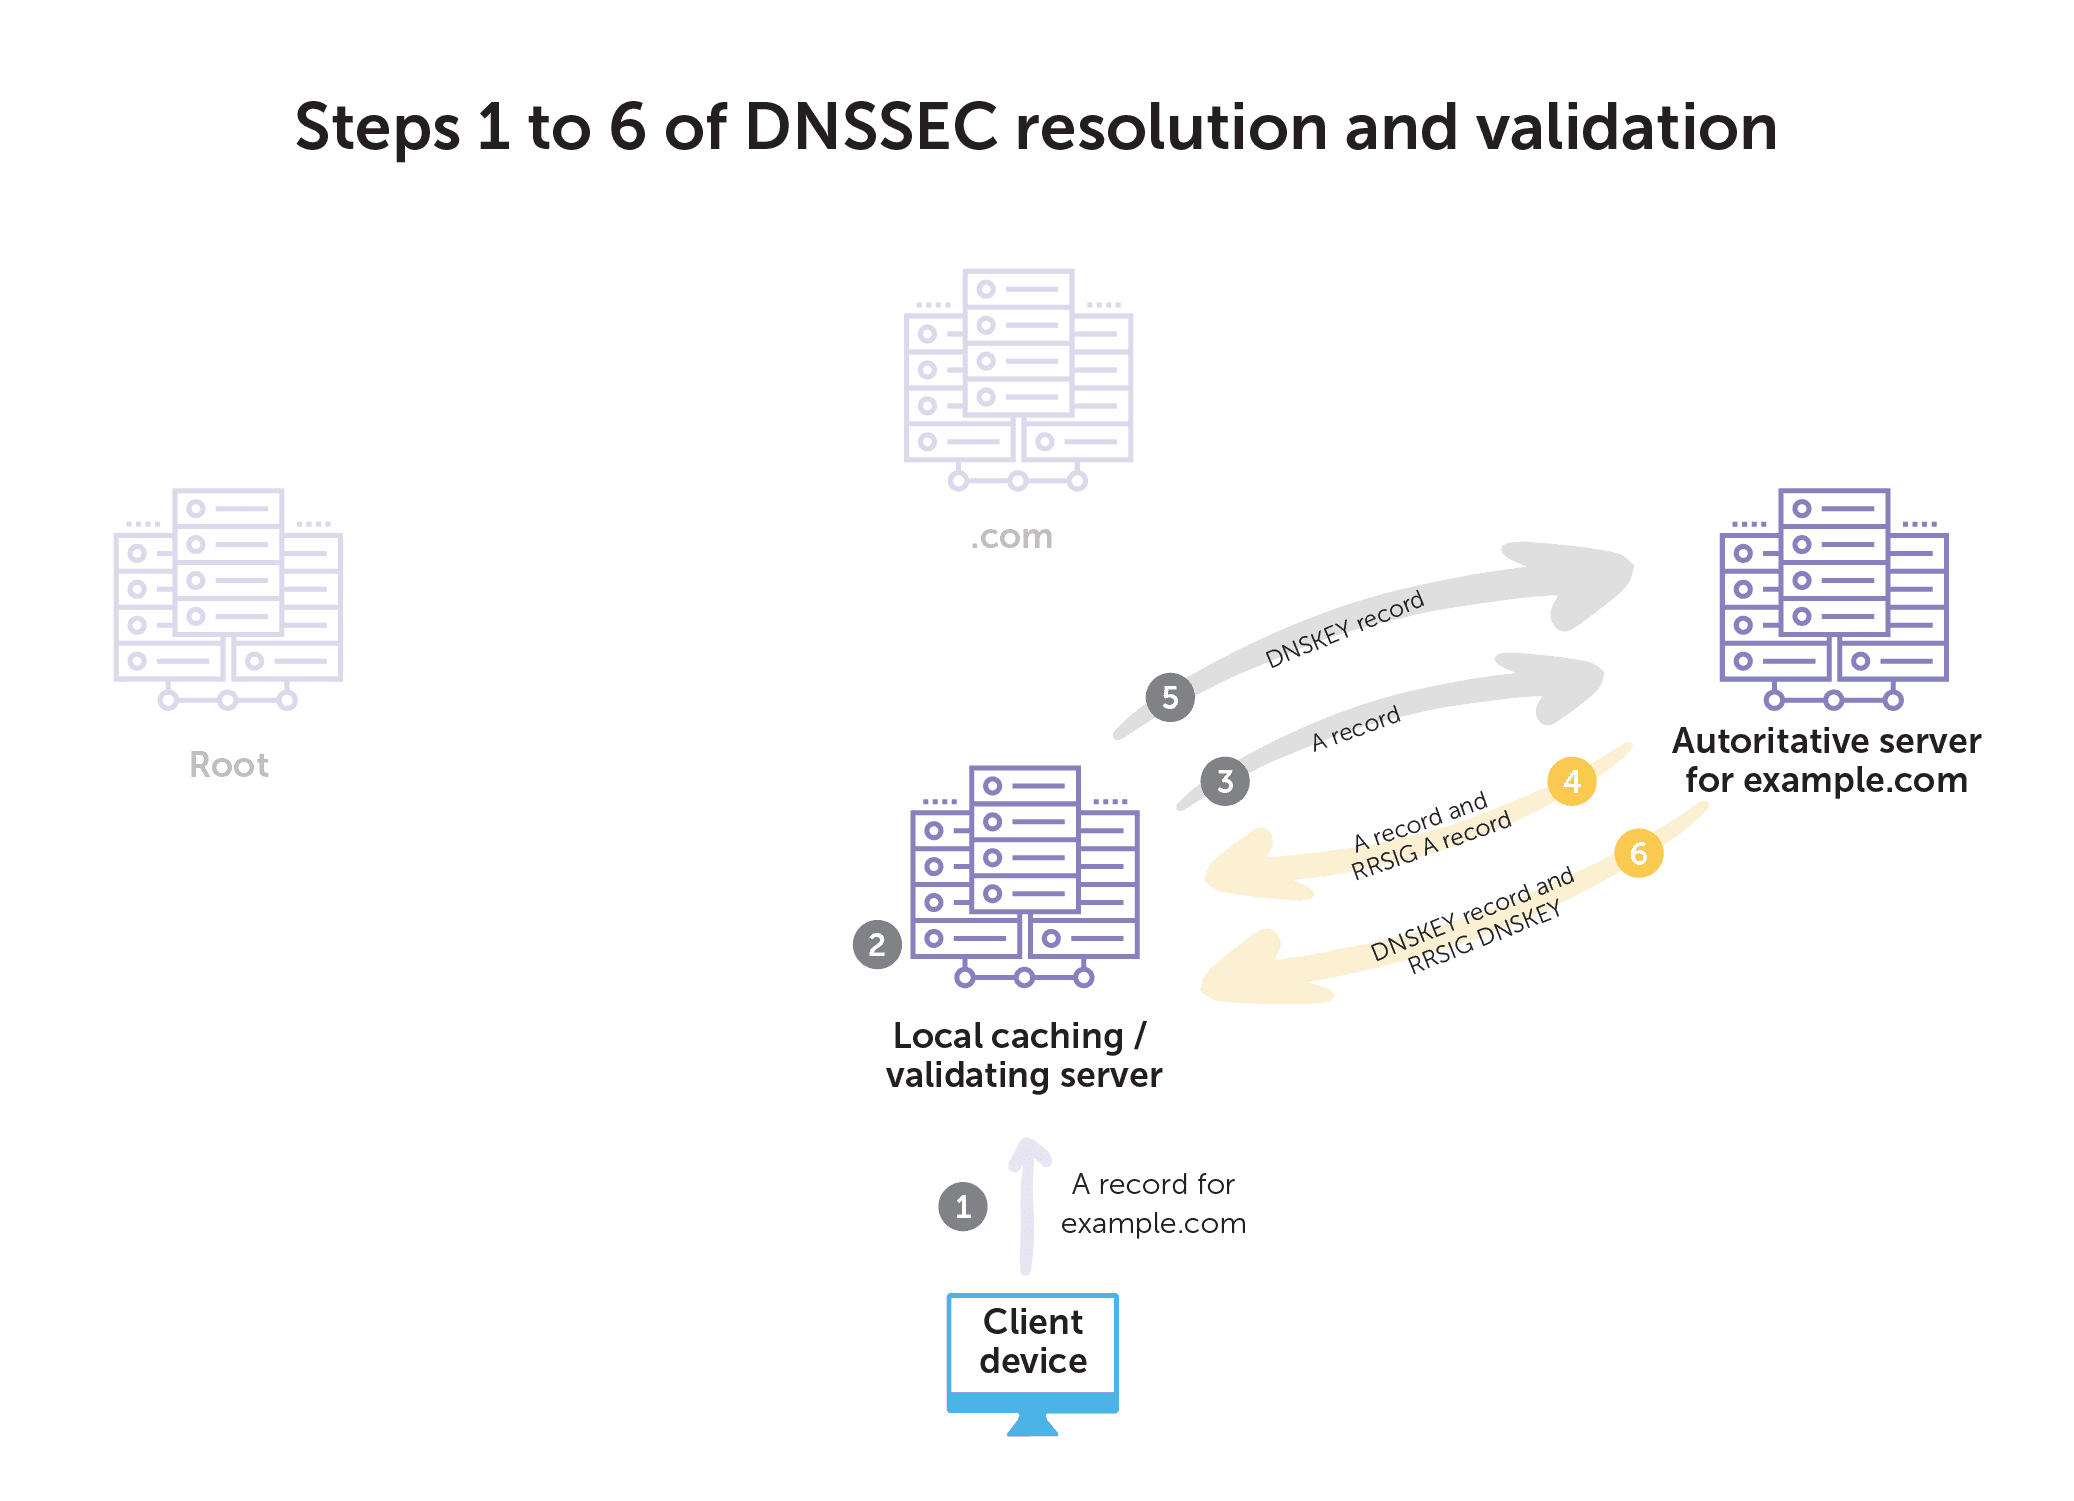
- Next, the recursive server asks .com for the DS record for example.com.
- The .com server responds with the DS record and corresponding RRSIG DS record for example.com.
- Then, the recursive server requests the DNSKEY record from the .com server.
- The .com server responds with the DNSKEY record and corresponding RRSIG DNSKEY record.
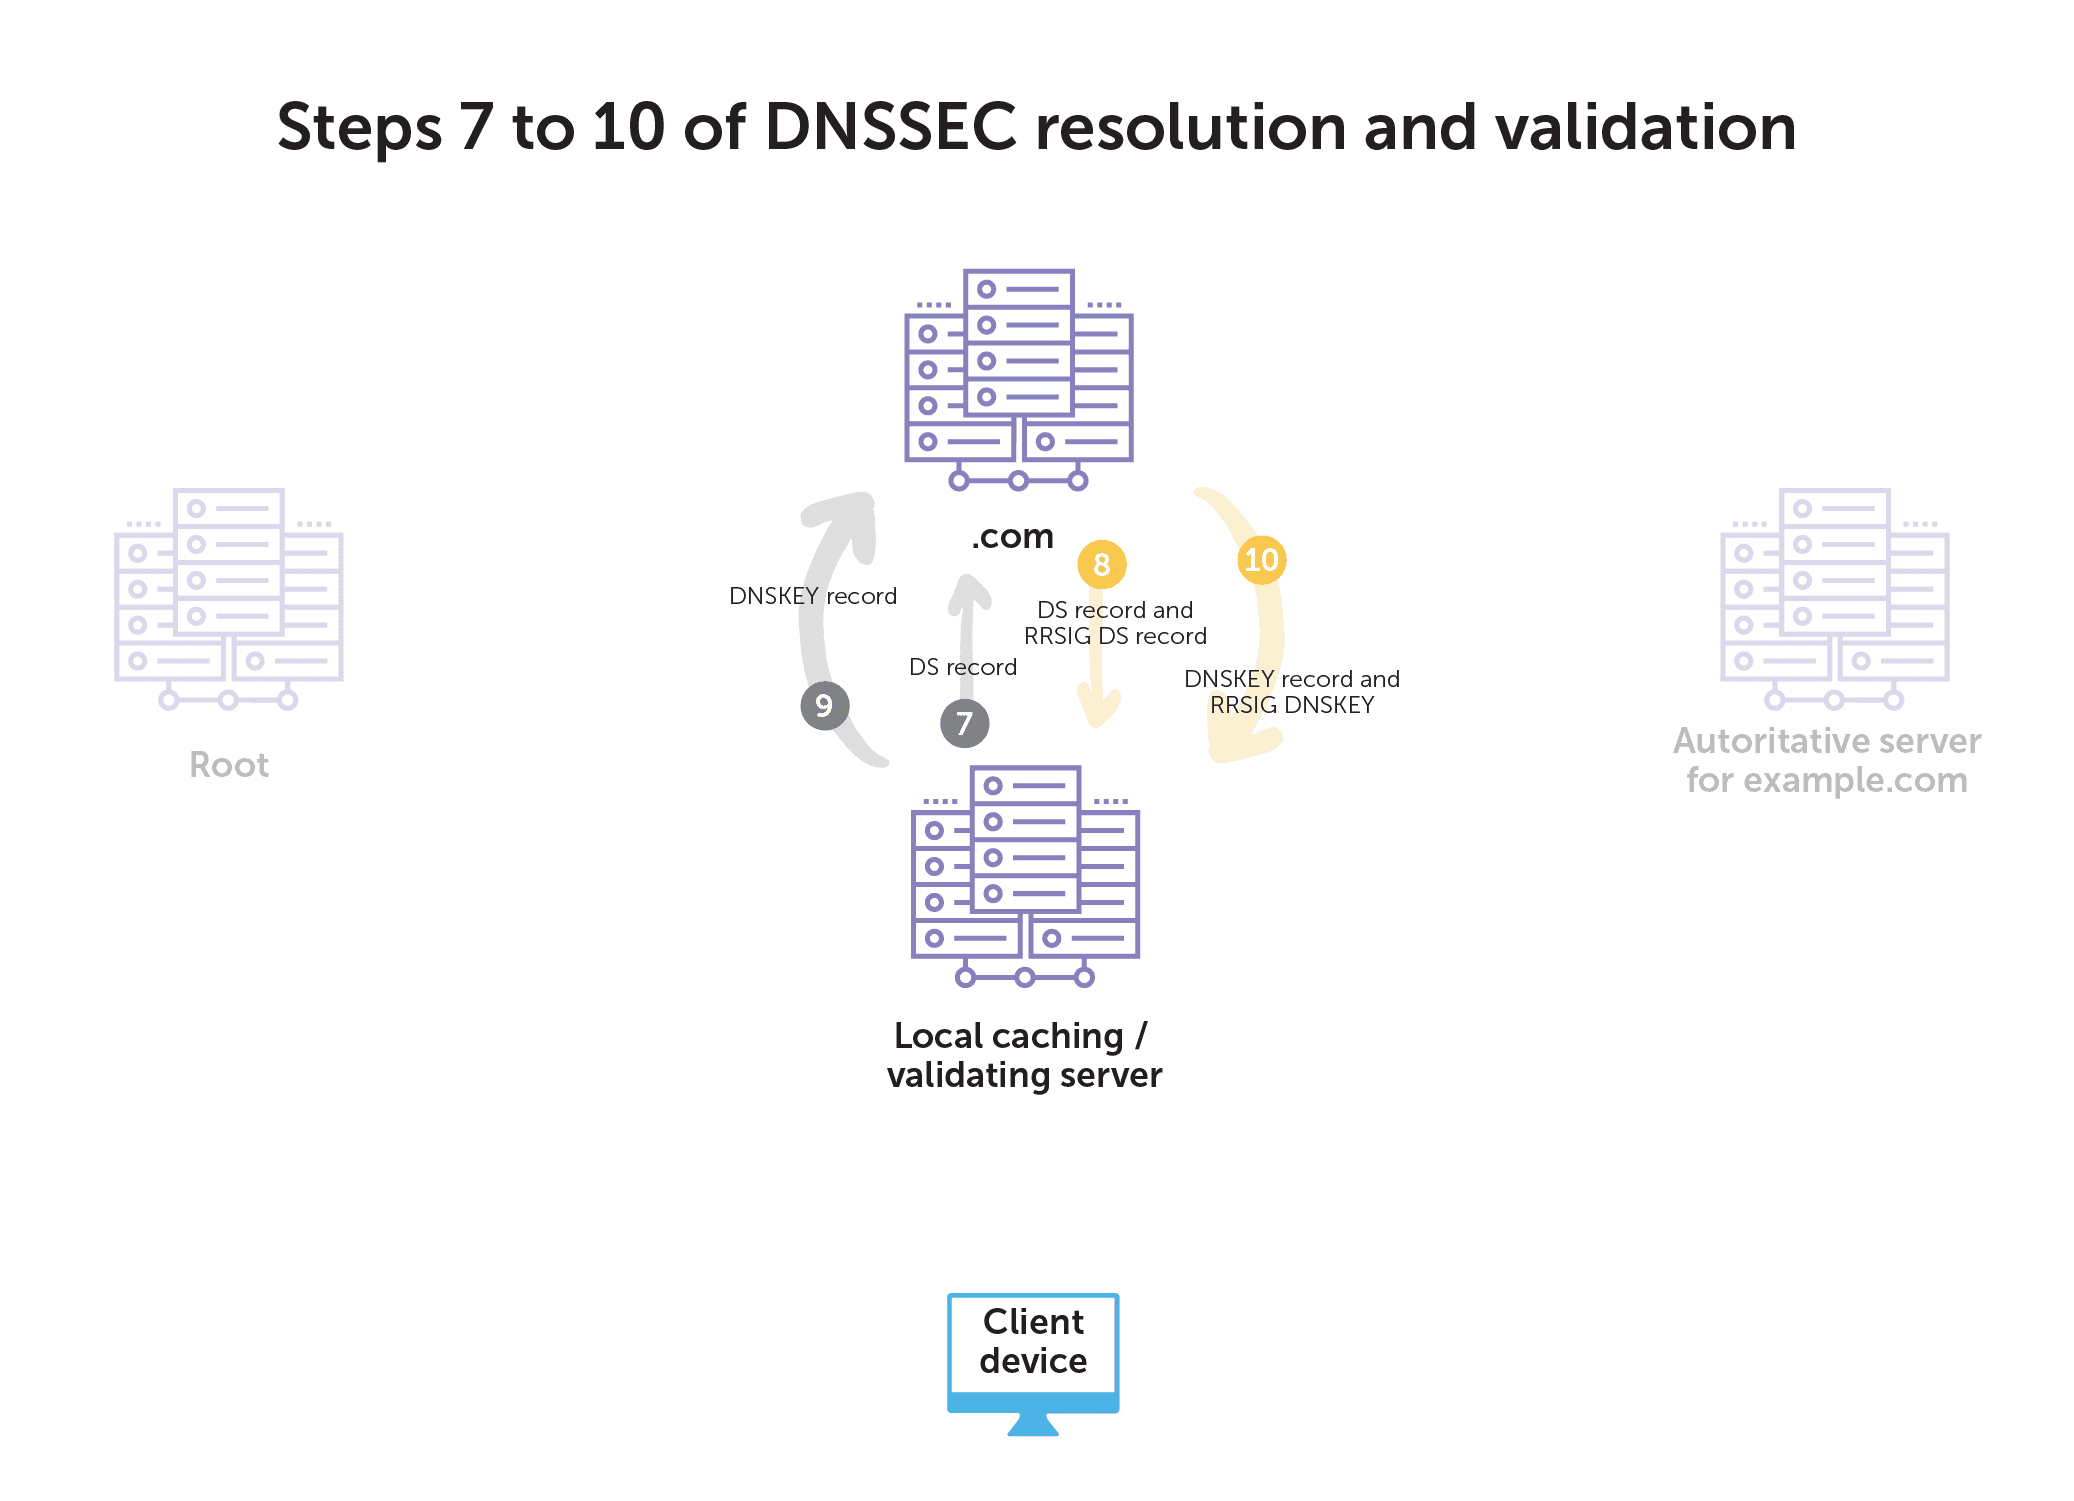
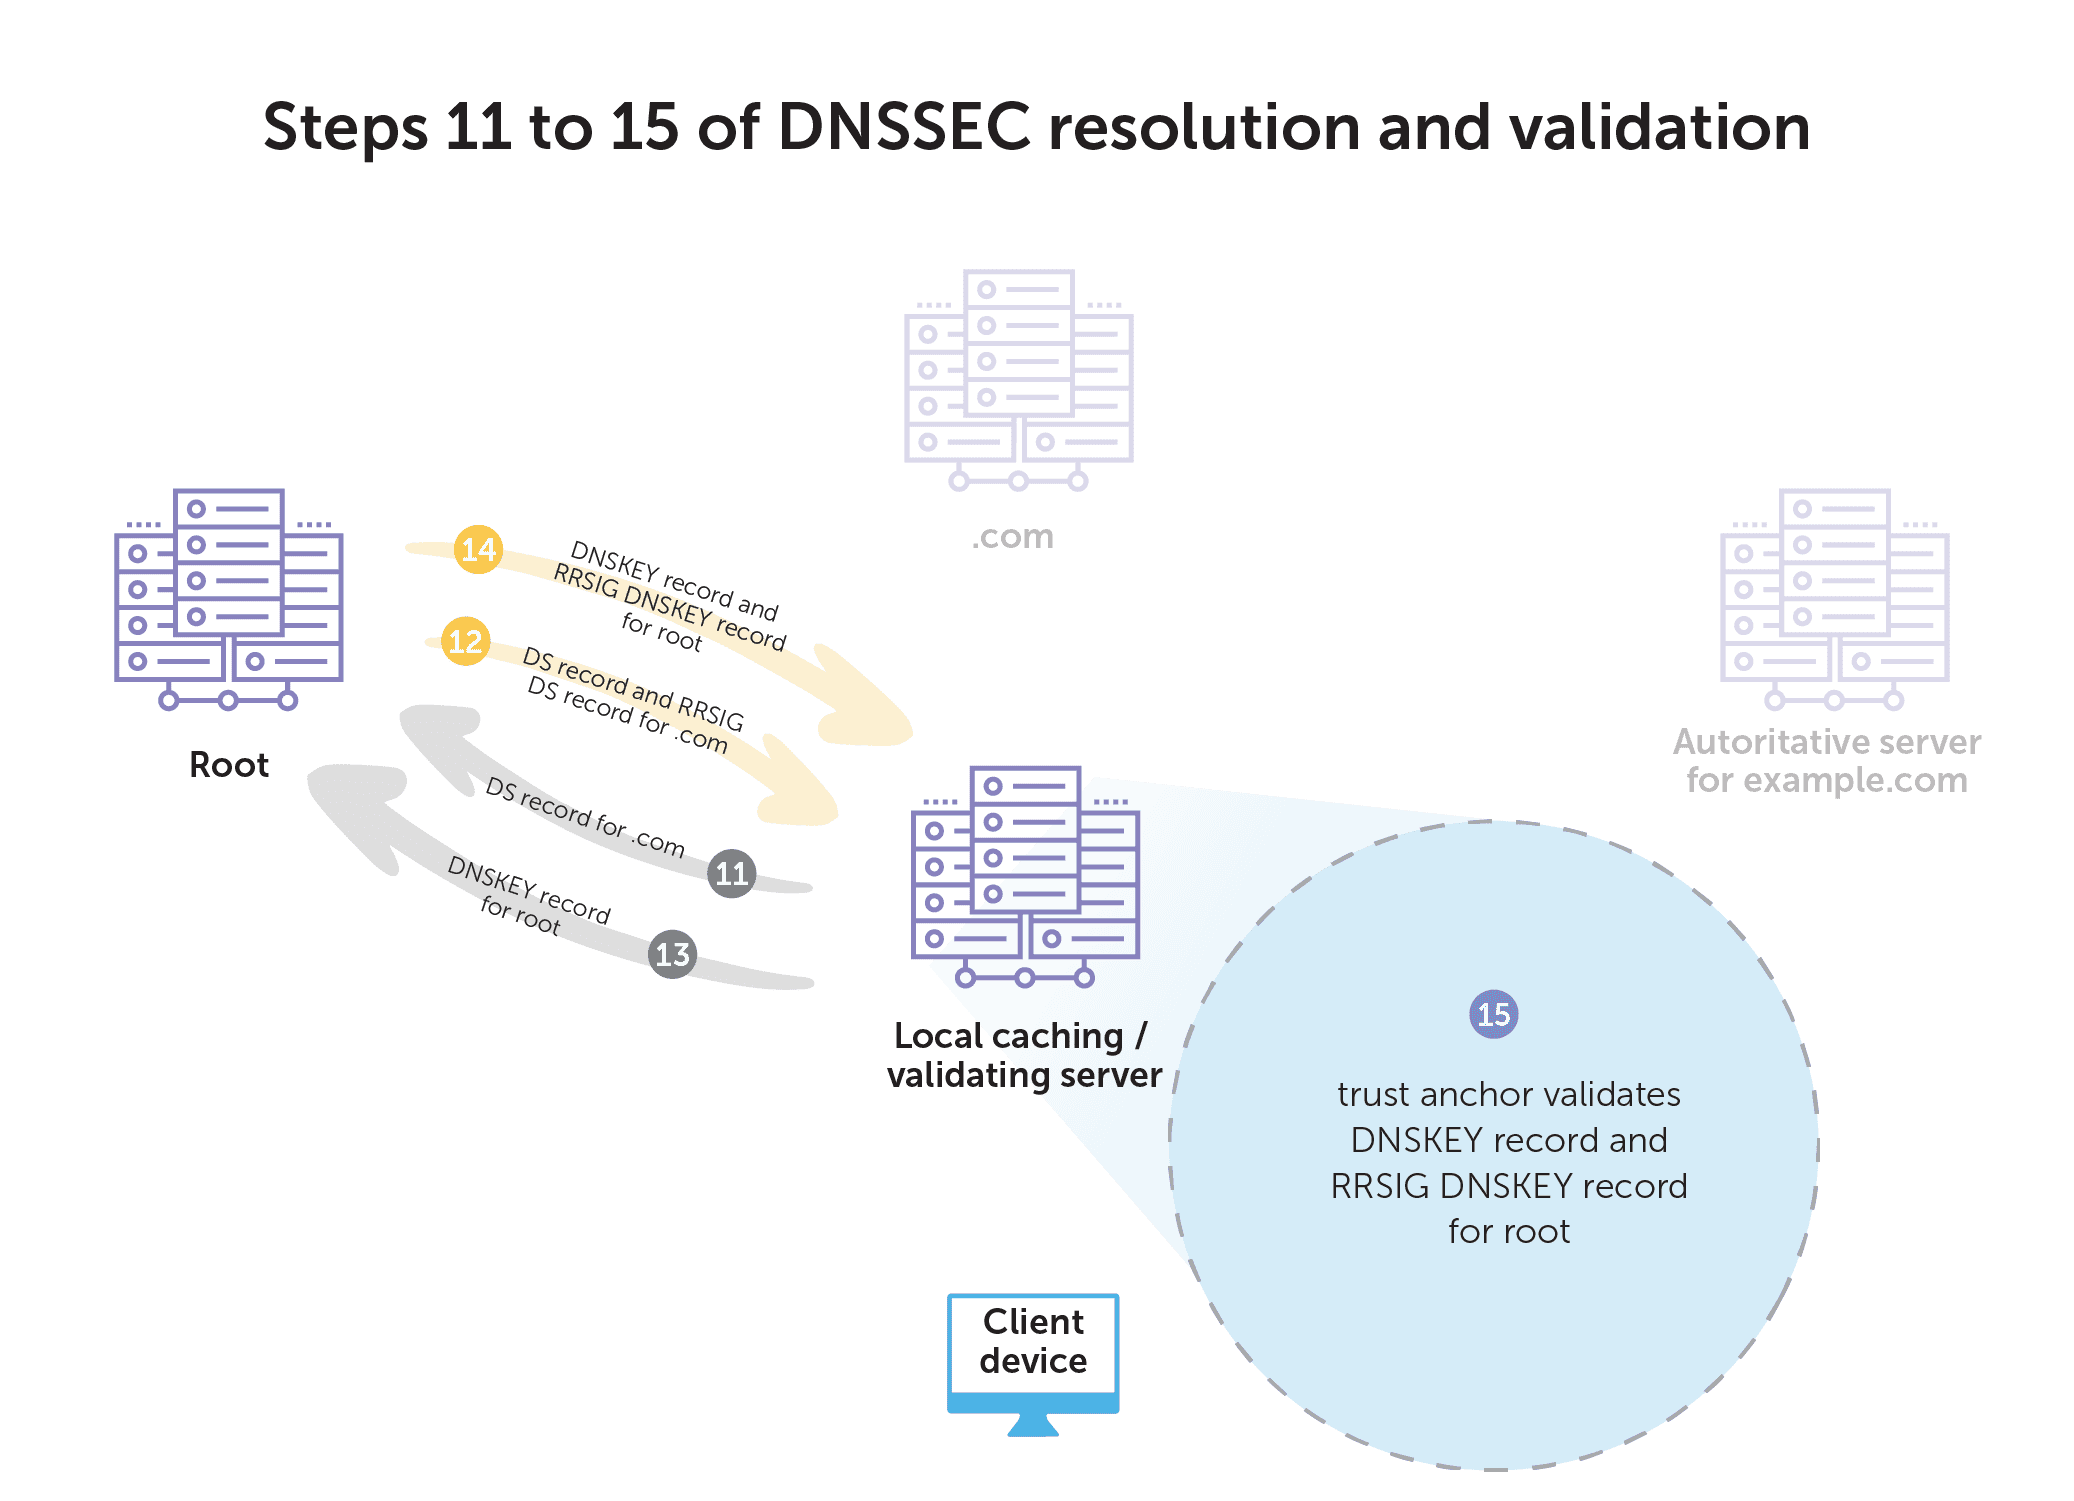
- Next, the recursive server requests the DS record of .com from the root servers.
- The root servers return the DS record and corresponding RRSIG DS record for .com.
- Then, the recursive server asks for the DNSKEY record for the root.
- The root server returns the DNSKEY record and the corresponding RRSIG DNSKEY record for the root.
- Finally, the recursive server uses the configured trust anchor to validate the DNSKEY record and corresponding RRSIG DNSKEY record for root. DNSSEC-aware resolvers have the necessary key for validating responses from root servers already built-in.
Cached answers
These steps cover the first query for a zone if the answer isn’t already cached. Once cached, all of the validation up the chain to root has already been validated. In that case, if a client asks for a different A record from example.com, it only has to do the work of validating the signature on the A record.
The Internet Systems Consortium’s 10-part webinar series on DNSSEC explores the process in depth. Their fourth webinar on DNSSEC resolution and validation is helpful to learn more.
Interrupting man-in-the-middle attacks
With DNSSEC enabled during an attempted man-in-the-middle attack, the validating resolver rejects the response from a rogue server because it does not have the cryptographic data that validates its origins. The resolver does not return the fake response to the client and they are not directed to the rogue site.
Additionally, DNSSEC provides proof of non-existence (PNE). With PNE, DNSSEC-signed zones can prove that an NXDOMAIN response (a “that site does not exist” response) is legitimate. This prevents an attacker from injecting a fake NXDOMAIN response in an attack. While it won’t redirect a client to their malicious server, it will make it appear as if you are offline to anyone behind the affected cached server.
BlueCat makes implementing DNSSEC easier
When it comes to figuring out how to implement DNSSEC, it’s easy to underestimate its complexity and how much knowledge it requires. Without a centralized and automated DNS infrastructure, it is even more challenging.
At a minimum, manual implementation requires record maintenance and key rollover (periodically updating keys to curb the chances of compromise).
But beyond that, there are significant steps, like resigning RRsets and zones, that have to be performed every time there is a change to a zone. Doing any of those steps incorrectly will result in the zone going dark. Maintaining the PNE chain is also one of the most tedious—and easiest to mess up—parts of manually managing DNSSEC-signed zones.
When you centralize your DNS infrastructure with BlueCat, these DNSSEC-related tasks happen in the background, automatically:
- Generating cryptographic key pairs
- Generating and maintaining the PNE chain (with NSEC or NSEC3 records) for every record in the zone
- Signing zones and all associated DNS records
- Generating DS records for parent zones
- Seamlessly rolling over KSKs and ZSKs on a defined schedule
- Generating new KSKs or ZSKs in the event of an emergency rollover
- Monitoring key generation success and failure
- Manually generating new key pairs in the event of an unsuccessful auto-generation
BlueCat simplifies DNSSEC by allowing customers to easily configure it from one central platform. Learn how the BlueCat platform can help.
Published in:

Rebekah Taylor is a former journalist turned freelance writer and editor who has been translating technical speak into prose for more than two decades. Her first job in the early 2000s was at a small start-up called VMware. She holds degrees from Cornell University and Columbia University’s Graduate School of Journalism.
Related content

We bet on Intelligent NetOps two years ago. Infoblox now has too.
With Infoblox acquiring Kentik, BlueCat’s CEO confirms its vision for a single platform unifying DDI, network monitoring, and observability.
BlueCat DDI data boosts Cisco Cloud Control AI-driven operations
BlueCat’s integration with Cisco Cloud Control provides AI agents with access to trusted DDI data for network investigation and remediation.

Automate your DDI modernization path by migrating with Micetro
Automate cross-platform DNS and DHCP migration with Micetro to reduce risk, eliminate manual effort, and modernize infrastructure faster.

How to map your network with user-defined links in Integrity X
Map your network with user-defined links in Integrity X to define and manage custom relationships, such as dual-stack and NAT environments.