How to configure DHCP failover
In this demo, learn how to configure the DCHP failover protocol for BAM and BDDS, pairing DCHP servers to provide redundancy and load balancing.
The DHCP failover protocol provides a method for two DHCP servers to communicate with each other. Depending on the configuration, DHCP failover can provide both redundancy and load balancing by sharing one or more pools between two or more DHCP servers. The servers are known as failover peers.
After placing two DHCP servers in a failover relationship, each DHCP pool’s addresses are divided between primary and secondary servers. Peers don’t need to be located in the same subnet, either. You get both DHCP server redundancy and placement flexibility.
When you configure failover DHCP, keep in mind that:
- DHCP failover is only supported on BlueCat DNS/DHCP Servers (known as BDDSes).
- Enabling or disabling DHCP failover will restart the DHCP service, resulting in a service interruption.
This short video provides a step-by-step guide for how to configure the DHCP failover protocol for BlueCat Address Manager (BAM) and BDDS. A complete transcript of the video also follows below.

Transcript of how to configure DHCP failover
The DHCP failover protocol provides a method for two DHCP servers to communicate with each other. Depending on the configuration, DHCP failover can provide both redundancy and load balancing. DHCP failover works by sharing one or more pools between two DHCP servers.
All right. So, let’s get started. Just a couple of prerequisites to make note of here. I am running Address Manager and BDDS 9.2. I’m logged in as the admin. I’ve created a configuration in Address Manager. As well, I have an IP block and network, and I have a DNS view.
Adding DHCP servers
So, here I have an XHA pair running, providing DNS, but let’s add some DHCP servers and set them into a failover relationship.
All right. So, I’m going to, let’s add some GEN4-5000s, BDDS75. I’m going to call this one dhcp1. I’m going to set my IPv4 address on eth0. I’m going to select .91. I have to enter a hostname. Let’s call this dhcp1.example.com. Now, these are the defaults from the Add Server page. You can leave this one selected to connect to the server. That’s necessary. We’re not going to upgrade now. You have to enter your default password, which is bluecat. That should be changed when you’re first deploying the servers. And let’s click Detect Server Settings.
So, what this does is this verifies in Address Manager the software version of the BDDS, the number of interfaces, and if dedicated management on eth2 is enabled or disabled. For the purposes of this demo video, I have dedicated management disabled.
All right. So there we see the IP on eth0, IPv4. I don’t need the XHA backbone. I could add an IPv6 address. That’s optional. I will leave that out for this demo. And let’s click Add Next. All right. So, let’s add our next DHCP server. I’ll select the same server profile. Let’s call this one dhcp2. I’m going to set my IPv4 address on eth0, and let’s set a host name. And once again, we will set our default server password and click Detect Server Settings.
All right. So let’s add this server. All right. Excellent. So there we see dhcp1 and dhcp2.
Setting DHCP deployment options at the server level
Now, a really important part of configuring DHCP failover is setting DHCP deployment options at the server level. So, this is where I am. So, I’m going to do this right now.
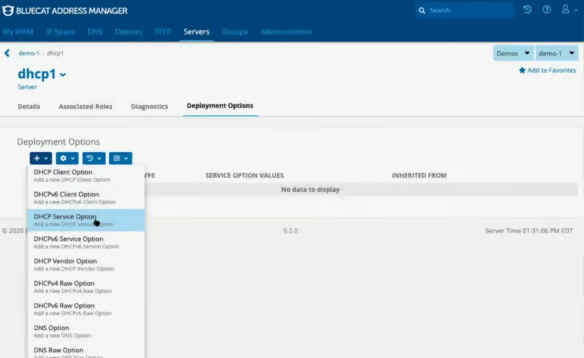
Okay. So, I’m going to click through to a server. In the top here, you see associated roles, diagnostics, deployment options. So, I’m going to click there. Now, you want to select a DHCP Service Option. I’m not using DHCPv6. So the v4 is simply called DHCP Service Option. Now, with DHCP failover, there are five DHCP deployment options that need to be configured. By clicking on this dropdown, there are many options. Thankfully, all the DHCP deployment options are clustered together.
So, the first one we’re going to start with is Load Balance Override. Right here. Let’s set that to three seconds. Add Next. Okay. Let’s set our second DHCP deployment option, which is Load Balance Split, and it’s right below the first option that we set. And our default value is 128 seconds. Add Next. All right. Our third option that we need is Maximum Client Lead Time. Again, clustered here. And that recommended default is 1,800 seconds. Okay. And Add Next.
Next option that we need is Max Response Delay. And this one is 60 seconds. And we have one more, Maximum Unacknowledged Updates. And for this one, the recommended default is 10. So, I’ll click Add there. Okay. So, here we see our five deployment options on dhcp1. We need to do the same to dhcp2. Okay. So, now we have our deployment options on dhcp2. Before we can deploy, we need to set our DHCP deployment options. So, let’s click over to IP Space in Address Manager. I’m going to click into this block. Okay.
Selecting the primary and secondary server and deployment
So. here we see Deployment Options, Deployment Roles. I’m going to click Deployment Roles. And here you want to select DHCP Role. Okay. From the Add DHCP Role page, you have this dropdown here. The default is Master, also known as primary. Let’s select the Server Interface. So, I’m going to select dhcp1 as the primary DHCP server. I’ll click Add. And now we select the secondary for DHCP failover. So I’ll click Select Secondary Server Interface. I’m going to select dhcp2. And I will click Add. All right.
And lastly, to ensure that these changes go through, I’m going to select both of these servers, and I’m going to Deploy. And as you can see from the Confirm Server Deploy page, I’m deploying DHCP only to these two servers. The BAM UI shows the progress. Again, deployment length can vary depending on the size of your configuration. And that’s it.
For more detailed information on DHCP fail over, please refer to the Address Manager Administration Guide. There’s a lot of good stuff in there, including details on DHCP failover states.